1 Spring Boot 对静态资源的映射规则
Spring MVC 的自动配置在WebMvcAutoConfiguration类中。
资源映射配置的方法:addResourceHandlers()。
欢迎页的配置:welcomePageHandlerMapping()。
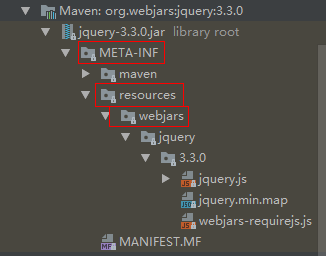
1、所有的/webjars/**路径访问,都去classpath:/META-INF/resources/webjars/下找资源。
webjars:以jar包的方式引入静态资源。可以像引入其他依赖一样,将静态资源的依赖引入到项目中。依赖网址:https://www.webjars.org例如:引入jquery依赖:
2
3
4
5
6
> <groupId>org.webjars</groupId>
> <artifactId>jquery</artifactId>
> <version>3.3.0</version>
> </dependency>
>
访问资源的路径:
localhost:8080/webjars/jquery/3.3.0/jquery.js。就会到/META-INF/resources/webjars/下找。
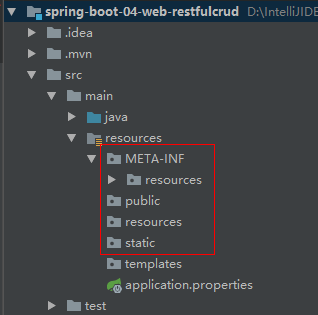
2、/**路径的访问:访问当前项目的任何资源,会从以下路径查找:
1 | classpath:/META-INF/resources/ |
类路径:
java和resources文件夹下路径都是类路径的根目录。可以使用
spring.resources.static-locations来配置静态资源路径。加载顺序:
META/resources、resources、static、public。所以相同名称的资源文件会按照加载顺序优先加载。
3、欢迎页:静态资源文件夹下的所有index.html页面,被/**映射。
4、网站的图标:**/favicon.ico都在静态资源文件下找。
注:实际开发中,一般是做前后端分离的,静态资源文件一般都不放在java项目中。静态资源文件都存储在CDN。
2 模板引擎:Thymeleaf
2.1 引入Thymeleaf
1 | <dependency> |
注意:如果使用的是Spring Boot 1.5.x 版本,默认的thymeleaf的版本是2.1。若想将thymeleaf切换到3.x版本,需要在pom的<properties>标签下配置:
1 | <properties> |
2.2 Thymeleaf使用&语法
1 | (prefix = "spring.thymeleaf") |
只要我们把HTML页面放在classpath:/templates/目录下,Thymeleaf就可以自动渲染了。
【导入名称空间】:
在html标签上导入thymeleaf的名称空间:xmlns:th="http://www.thymeleaf.org"。目的是为了由代码提示。
2.2.1 th:任意属性
使用th:任意html属性:来替换元素属性的值。
1 | <div id="111" th:id="#{id}"></div> |
通过
thymeleaf引擎,th:id的值会将id的值替换掉。
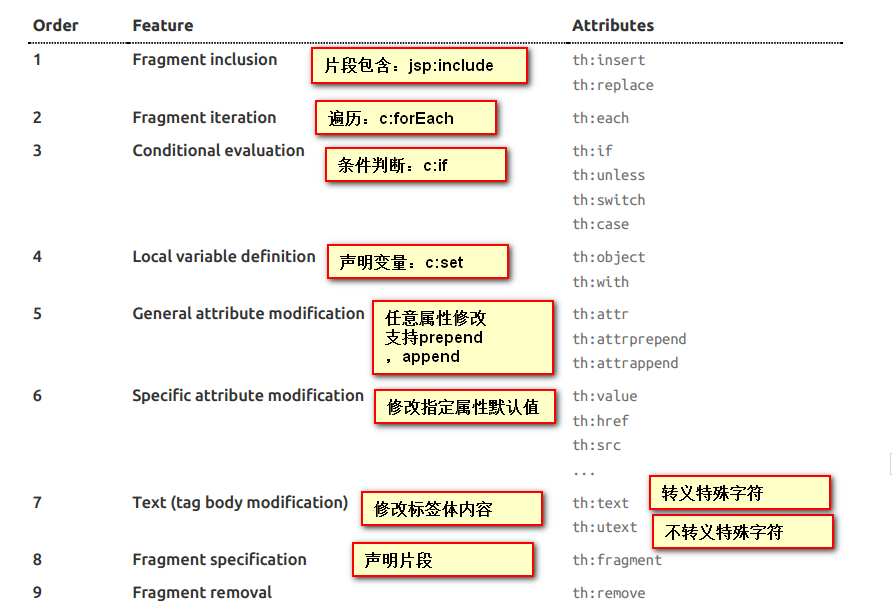
th:text:修改标签体内容,转义特殊字符;th:utext:不转义特殊字符。
它们的行内写法:th:text:[[]]。 th:utext:[()]
2.2.2 表达式
一、【Simple expressions】:简单表达式
1 | Simple expressions: |
1、${...}:变量表达式,底层是OGNL表达式。
获取对象属性,调用方法。和OGNL一样。
使用内置基本对象。以
#开头:例:1
${#locale.country}
1
2
3
4
5
6
7#ctx : the context object.当前上下文对象。
#vars: the context variables.当前上下文变量值。
#locale : the context locale.当前上下文区域信息。
#request : (only in Web Contexts) the HttpServletRequest object.
#response : (only in Web Contexts) the HttpServletResponse object.
#session : (only in Web Contexts) the HttpSession object.
#servletContext : (only in Web Contexts) the ServletContext object内置的工具对象:
1
2
3
4
5
6
7
8
9
10
11
12
13
14
15
16
17#execInfo : information about the template being processed.
#messages : methods for obtaining externalized messages inside variables expressions, in the same way as they
would be obtained using #{…} syntax.
#uris : methods for escaping parts of URLs/URIs
#conversions : methods for executing the configured conversion service (if any).
#dates : methods for java.util.Date objects: formatting, component extraction, etc.
#calendars : analogous to #dates , but for java.util.Calendar objects.
#numbers : methods for formatting numeric objects.
#strings : methods for String objects: contains, startsWith, prepending/appending, etc.
#objects : methods for objects in general.
#bools : methods for boolean evaluation.
#arrays : methods for arrays.
#lists : methods for lists.
#sets : methods for sets.
#maps : methods for maps.
#aggregates : methods for creating aggregates on arrays or collections.
#ids : methods for dealing with id attributes that might be repeated (for example, as a result of an iteration).
2、*{..}:选择变量表达式。和${}在功能上一样。有一个不从功能,配合th:object使用:
1 | <div th:object="${session.user}"> |
使用
th:object获取到一个对象,可以使用*{}来获取到对象中的每个属性。等同于:
2
3
4
5
6
> <p>Name: <span th:text="${session.user.firstName}">Sebastian</span>.</p>
> <p>Surname: <span th:text="${session.user.lastName}">Pepper</span>.</p>
> <p>Nationality: <span th:text="${session.user.nationality}">Saturn</span>.</p>
> </div>
>
3、#{...}:获取国际化内容的。
4、@{...}:定义URL。
1 | <!-- Will produce 'http://localhost:8080/gtvg/order/details?orderId=3' (plus rewriting) --> |
如果由多个参数可以写成:
@{/order/process(execId=${execId},execType='FAST')}。
5、~{...}:片段引用表达式。
二、【字面量】:字符串、数字,布尔,null,多个数字逗号隔开。
1 | Literals: |
三、【文本操作】:
1 | Text operations: |
四、【数学运算】:
1 | Arithmetic operations: |
五、【其他】:
1 | Boolean operations: 布尔运算 |
2.2.3 公共页面抽取
一、使用th:fragment声明抽取的公共片段。
二、使用th:insert/th:replace/th:include引入公共片段。
th:insert:将公共片段整个插入到声明引入的元素中。
th:replace:将声明引入的元素替换为公共片段。
th:include:将被引入的片段的内容包含到声明引入的元素中。
表达式:"~{模板名::选择器}"或者"~{模板名::片段名}"。
模板名:
th:fragment所在的模板名。
3 SpringMVC 自动配置原理
Spring MVC 的自动配置在WebMvcAutoConfiguration类中。
Spring Boot 对 Spring MVC 的默认配置如下:
一、自动配置了ContentNegotiatingViewResolver和BeanNameViewResolver 视图解析器。
ContentNegotiatingViewResolver:组合所有的视图解析器。ContentNegotiatingViewResolver不是自己处理View,而是代理给不同的ViewResolver来处理不同的View,所以它有最高的优先级。
我们可以自己向容器中添加一个视图解析器,ContentNegotiatingViewResolver会将其自动组合进来。
二、静态资源映射:静态资源文件夹路径和webjars。
三、静态首页访问index.html。
四、自定义网站图标favicon.ico。
五、自动注册了Converter、Genericconverter、Formatter的beans。
Converter:转换器。
Formatter:格式化器。例如格式化日期。
日期格式化器,需要在文件中配置
spring.mvc.date-format才生效。
我们可以自己向容器中添加的格式化转换器,自动配置会自动注册。
六、支持HttpMessageConverters。
HttpMessageConverters: Spring MVC用来转换HTTP请求和相应的。
我们可以自己向容器中添加HttpMessageConverters,只需要将自己的组件注册到容器中。
4 扩展 Spring MVC(重要)
如果我们想保留Spring Boot 对MVC的自动配置,并且向添加一些额外的MVC配置,例如拦截器,转换器,视图解析器等等。我们可以编写一个配置类,实现WebMvcConfigurer接口,但是不能标注@EnableWebMvc。
这样既保留了所有的自动配置。也可以用我们自己的配置。
以添加视图映射为例:
1 |
|
注意:在Spring Boot 1.5.x中,扩展Spring MVC 时需要配置类继承WebMvcConfigurerAdapter接口。WebMvcConfigurerAdapter是WebMvcConfigurer的空实现。 因为Spring Boot 2.x是以Spring framework 5为基础,其底层是java8实现,java8中的接口有默认方法(default method),因此就不在需要一个适配器(adapter)进行空实现了。
5 全面接管Spring MVC(不推荐)
如果想全面接管Spring MVC,即不使用 Spring Boot 对 MVC 的自动配置,需要在配置类中添加@EnableWebMvc即可。
为什么添加了EnableWebMvc注解后,Spring MVC 的自动配置不起作用了呢?
我们看WebMvcAutoConfiguration注解:
1 |
|
其中:@ConditionalOnMissingBean(WebMvcConfigurationSupport.class)的意思是若容器中没有WebMvcConfigurationSupport这个类,WebMvcAutoConfiguration自动配置才生效。
这是我们看@EnableWebMvc注解:
1 | ({DelegatingWebMvcConfiguration.class}) |
它导入了一个DelegatingWebMvcConfiguration类:
1 |
|
发现这个类就是WebMvcConfigurationSupport类型的类。因此WebMvcAutoConfiguration自动配置类不生效。
6 国际化
步骤:
一、【编写国际化配置文件,抽取页面需要显示的国际化消息】。
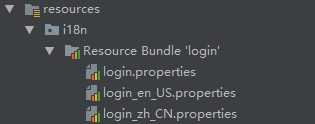
login_en_US.properties:
1 | login.password=Password |
login_zh_CN.properties:
1 | login.password=密码 |
二、【Spring Boot 自动配置好了管理国际资源文件的组件】。
国际化资源文件的默认基础名是message.properties。使用spring.messages.basename可以自定义基础名:
基础名:没有语言和国家的。
login.properties就是基础名。
1 | spring.messages.basename=i18n.login |
三、【在页面获取国际化的值】。
使用#{}获取国际化信息的值。
标签体中使用th:text="#{}"获取国际化值。
没有标签体的使用[[#{}]]获取国际化值。
四、【中英文手动切换】。
原理:国际化Locale(区域信息对象);使用LocaleResolver获取区域信息对象。
MVC自动配置中,默认配置了区域信息解析器LocaleResolver。Spring Boot 默认使用AcceptHeaderLocaleResolver,根据请求头Accept-Language获取区域信息进行国际化。
我们可以自定义一个LocaleResolver区域信息解析器,可以在链接上携带区域信息
1 | ("localeResolver") |
需要注意的是,自定义区域信息解析器bean的名称必须是
localeResolver。
如果url上带的参数上有language信息,使用参数的语言信息,如果没有就使用操作系统默认的语言。
th:href="@{/login.html(language='zh_CN')}"
7 页面上发送PUT请求
步骤一:SpringMVC中配置HiddenHttpMethodFilter。(Spring Boot 已自动配置)
步骤二:页面上创建一个post表单。
步骤三:创建一个input项,name为_method,value为指定的请求方式。
1 | <input type="hidden" name="_method" value="put"/> |
8 错误处理机制
8.1 Spring Boot 默认的错误处理机制
一、在浏览器中返回一个默认的错误页面。
二、在其他客户端,默认响应一个json数据:例如:
1 | { |
原理:参照ErrorMvcAutoConfiguration错误自动配置类。
自动配置给容器添加了以下组件:
1、DefaultErrorAttributes:在页面共享信息。
2、BasicErrorController:处理默认/error请求。
1 |
|
3、ErrorPageCustomizer:系统出现错误后,来到/error请求进行处理。
4、DefaultErrorViewResolver:Spring Boot默认去找error/状态码页面。如果模板引擎可以解析这个页面就用模板引擎解析,并返回视图地址。模板引擎不可用,就在静态资源文件下找对应的页面。
步骤:一旦系统出现4xx或者5xx之类的错误。ErrorPageCustomizer就会生效(定制错误响应的规则),就会来到/error请求。就会被BasicErrorController处理:1)响应的去哪个页面,由DefaultErrorViewResolver解析得到的。
8.2 定制错误处理
一、【定制错误页面】:
情况一:有模板引擎情况下(模板引擎可以解析错误页面):error/状态码(例如:error/404),将错误页面命名为错误状态码.html放在模板引擎文件夹里的error文件夹下,发生此状态码的错误就会来到这个页面。
可以使用
4xx/5xx作为文件名来匹配这种类型的所有错误。原则是精确优先。优先寻找有精确的状态码的html页面。
页面可以获取的信息:
1 | timestamp:时间戳 |
情况二:没有模板引擎(模板引擎找不到这个错误页面),在静态资源文件夹(static/resources/public)下找。(了解)
情况三:以上两种都没有,使用Spring Boot默认错误页面。
二、【定制错误的json数据】:
通过定制ErrorAttribute改变需要返回的内容。
9 配置嵌入式Servlet容器(Spring Boot 1.5.x)
Spring Boot 默认使用的是嵌入式的Servlet容器。
9.1 定制和修改Servlet容器相关配置
一、修改和server有关的配置:
方式一:ServerProperties,例如:
1 | # 配置端口号 |
方式二:编写一个EmbeddedServletContainerCustomizer:嵌入式的Servlet容器定制器。
1 | //一定要将这个定制器加入到容器中 |
以上两种方式,表现形式不同,但原理一样,都是实现EmbeddedServletContainerCustomizer来实现的。
9.2 注册Servlet的三大组件
在以前的项目中,Servlet三大组件的注册信息放在了/WEB-INF/web.xml中。Spring Boot 中没有该配置文件。
因此注册三大组件,需要使用ServletRegistrationBean、FilterRegistrationBean、ServletListenerRegistrationBean:
1 |
|
Spring Boot 帮我们自动注册DispatcherServlet用的就是这种方式。
9.3 使用其他的嵌入式Servlet容器
默认使用的是Tomcat,所以切换容器时,需要先排除Tomcat的依赖,然后引入需要切换的对应容器的依赖。
一、切换 Jetty:适合做长连接
1 | <dependency> |
二、Undertow:不支持JSP
1 | <dependency> |
9.4 嵌入式Servlet容器自动配置原理
EmbeddedServletContainerAutoConfiguration:嵌入式Servlet容器自动配置。
一、Spring Boot根据导入的依赖情况,给容器中添加嵌入式容器工厂EmbeddedServletContainerFactory(例如:TomcatEmbeddedServletContainerFactory)。
二、容器中某个组件要创建对象就会惊动后置处理器, EmbeddedServletContainerCustomizerBeanPostProcessor,只要是嵌入式容器工厂,后置处理器就工作,
三、后置处理器从容器中获取所有的嵌入式Servlet容器定制器EmbeddedServletContainerCustomizer,调用定制器的定制方法(customize)。
9.5 嵌入式Servlet容器启动原理
一、什么时候创建嵌入式Servlet容器工厂?
- SpringBoot应用启动运行main方法。
- Spring Boot刷新IOC容器
refreshContext(创建IOC容器并初始化容器,创建容器中的每一个组件)。 - web的IOC容器重写了
onRefresh方法,会创建嵌入式Servlet容器。获取嵌入式Servlet容器工厂。从容器中获取EmbeddedServletContainerFactory。TomcatEmbeddedServletContainerFactory创建对象。
二、什么时候获取嵌入式Servlet容器并启动Tomcat?
使用嵌入式Servlet容器工厂,获取嵌入式Servlet容器,创建Tomcat对象,并启动Tomcat。
先启动嵌入式Servlet容器,再将容器中剩下没有创建的对象获取出来。
IOC容器启动的时候创建嵌入式Servlet容器。
10 使用外置Servlet容器
使用嵌入式Servlet容器的缺点是不支持JSP。
可以使用外置的Servlet容器,应用打包成war包。
将tomcat的依赖改成provided。
打成war包的Spring Boot项目多了一个ServletInitializer 。